Running an fNIRS study
This page outlines relevant and optional steps in conducting an fNIRS study. The roadmap gives a broad overview of all the steps. For detailed instructions on each step, refer to the associated documents.
fNIRS procedure
Don’t Panic! A Hitchhiker’s Guide to fNIRS Data Analysis for Block-Design Paradigms
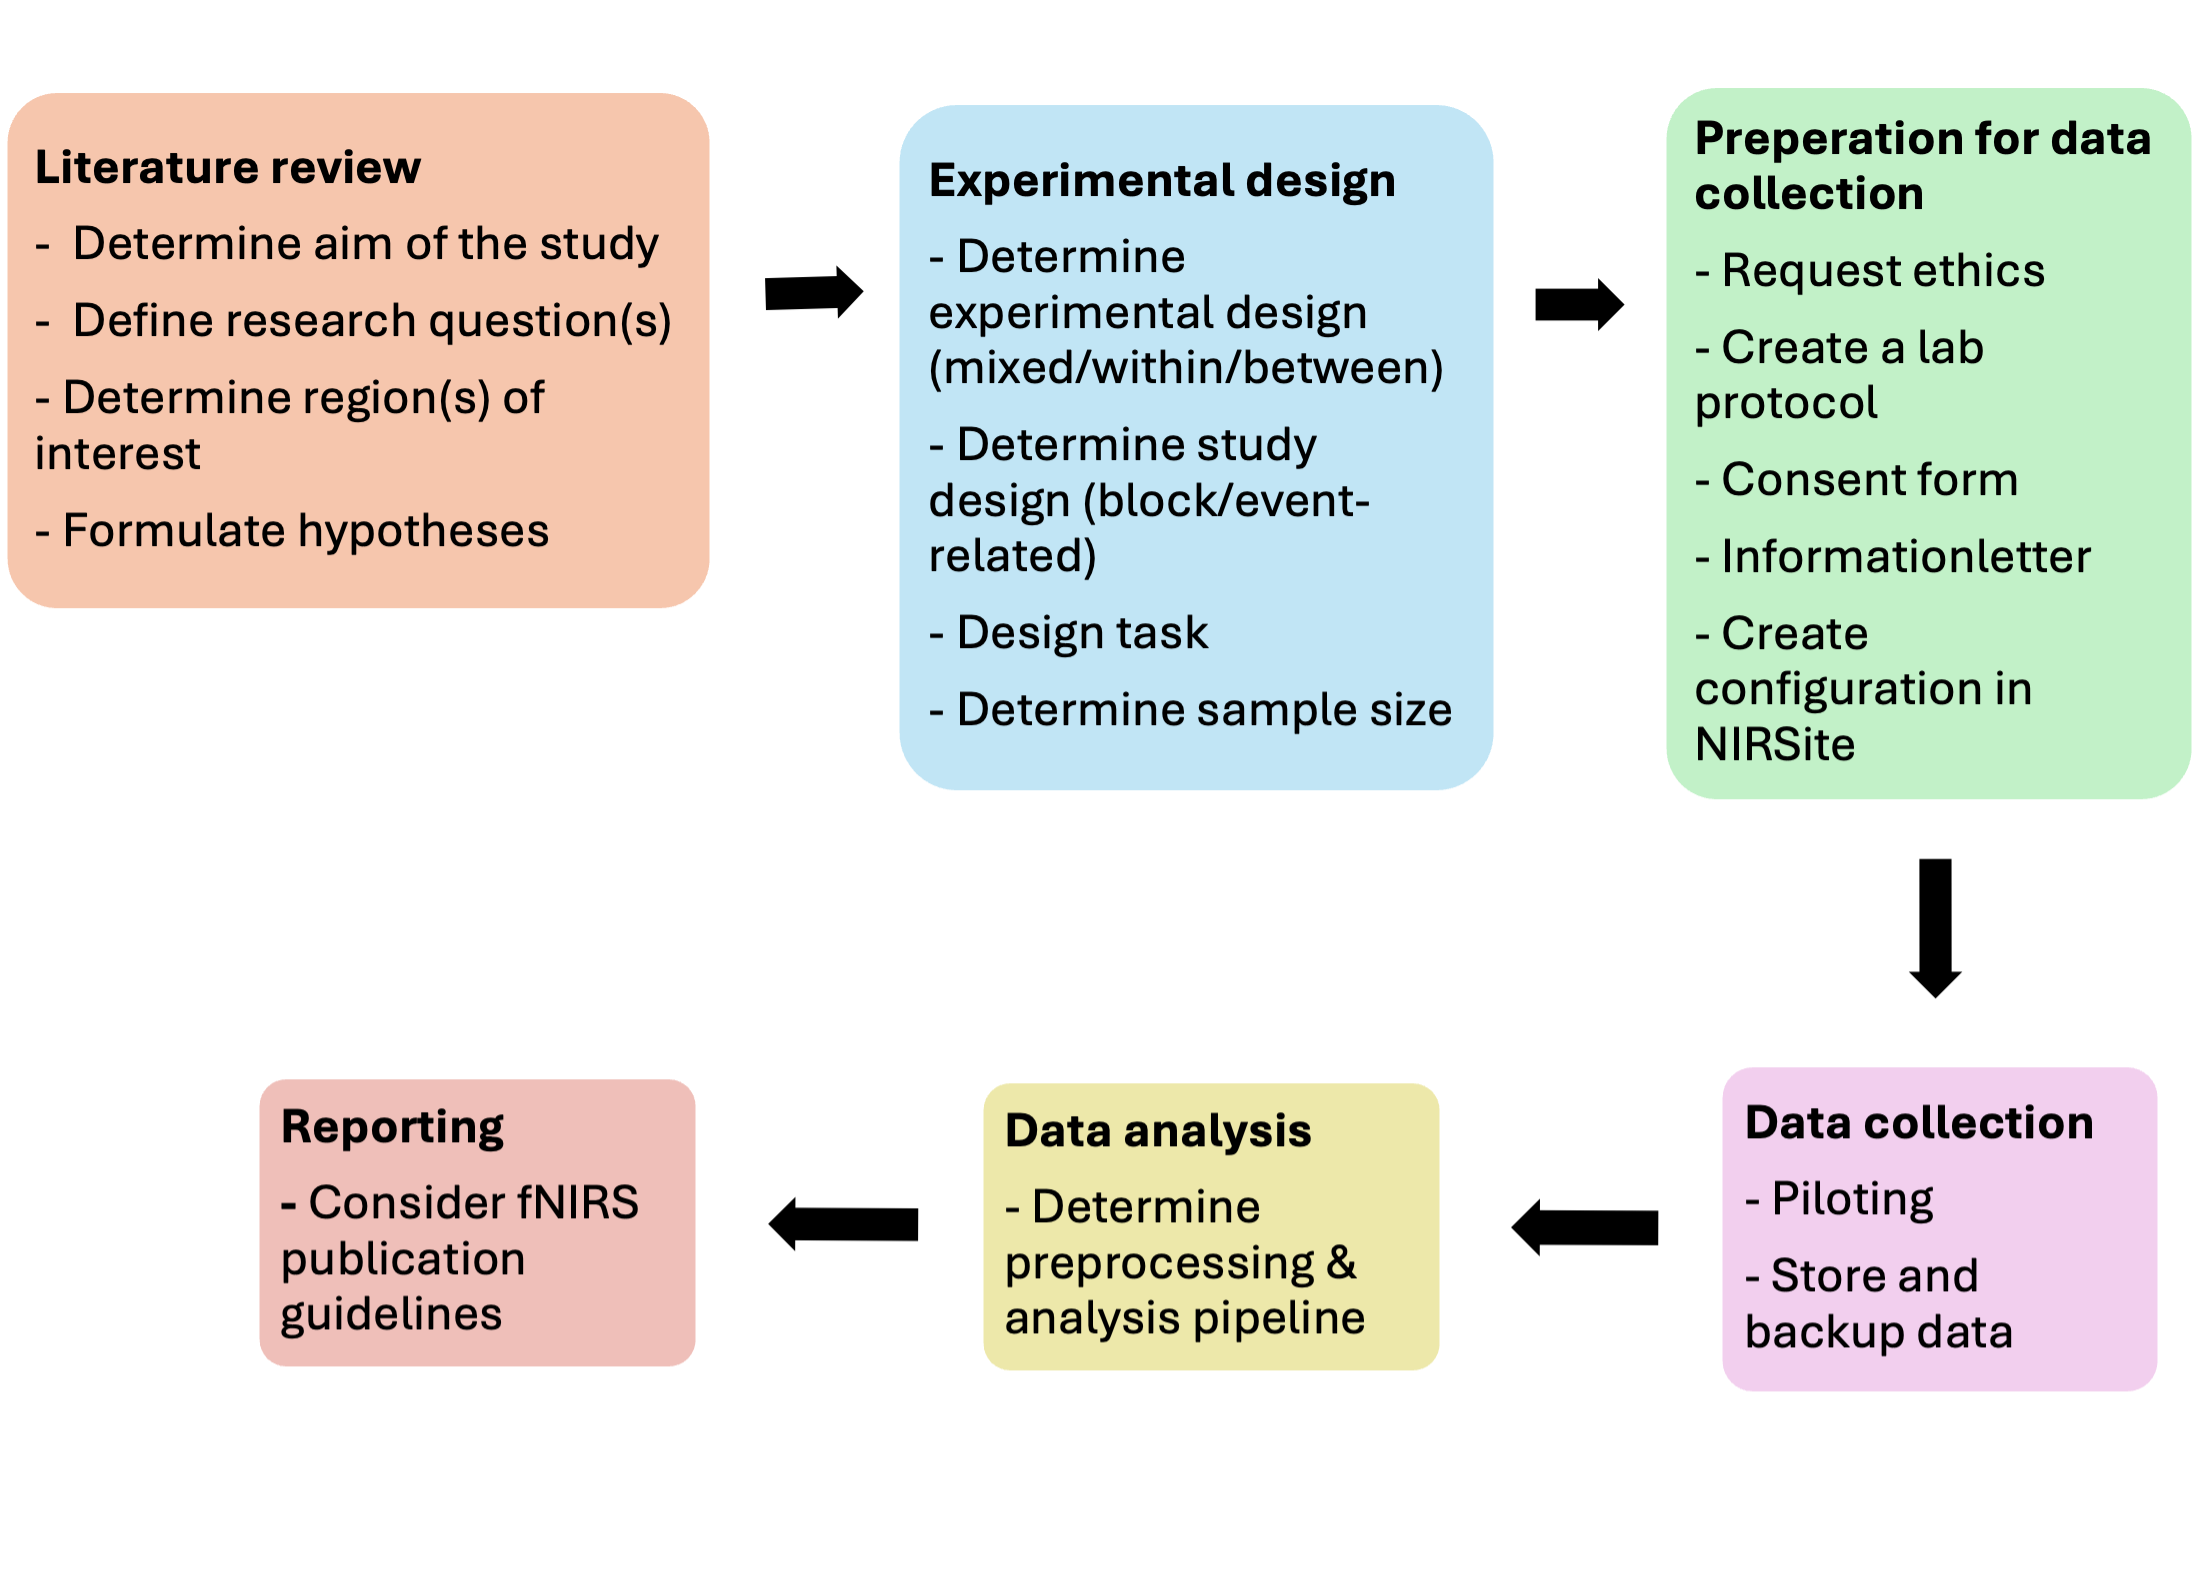
- Literature review
- Determine aim of the study
- Define your research question(s) and hypotheses.
- Determine region(s) of interest
- Consider the depth of the signal reach with fNIRS when determining your ROI.
- Experimental design
- Determine your experimental design
- Mixed, within or between subjects.
- Determine study design
- Lab-based study or real-life interaction study.
- Block or event-related design.
- Design task
- Think about what kind of control condition or baseline you would like to add.
- Depending on your task, consider adding a (jittered) interstimulus interval.
- Determine how you would like to send triggers: manual, via a trigger cable, or with Lab Streaming Layer.
- Decide on sample size
- Compare with fNIRS literature or conduct a power analysis.
- Determine whether you would like to add additional methods or
measures (e.g. breathing belt, short-distance channels, photogrammetry
etc.)
- Determine your experimental design
- Preparation for data collection
- Write up your information letter and consent form.
- Create a data management plan.
- Apply for an ethical review by the ethical committee.
- Create a study-specific lab protocol. Use the general lab protocol as a reference.
- Decide on your configuration using fNIRS Optode Location Decider (fOLD) and create the configuration in NIRSite.
- Data collection
- Piloting
- Consider feedback from participants
- Check whether triggers are accurate
- Troubleshooting
- Follow your study-specific lab protocol and the general lab protocol
- Data storage
- Store fNIRS data in BIDS
- Back up your data
- Piloting
- Data analysis
- Determine preprocessing steps (e.g. motion correction, filtering)
- Determine analysis (e.g. GLM, waveform)
- Document your decisions and scripts for transparency
- Reporting
- Interpretation
- Refer back to your original research questions and hypotheses
- Implications
- Read other relevant fNIRS literature to get an idea on how to report findings
- Follow the guidelines for publication s
- Interpretation
NIRx NIRSport triggering
Sending manual triggers
- Manual triggers can be sent by pushing F1, F2, … F12 on the keyboard.
- Whenever you create a trigger during a recording, you can see a vertical line in the line plot in Aurora.
Sending triggers from Psychopy
- In Psychopy, choose the parallel port component in the I/O menu and add it to your routine.
- Choose the start and stop timing of your trigger. A duration starting from 10ms can be detected by the fNIRS device.
- Make sure that the timing of the triggers is separated by at least 100ms.
- Set the data that the trigger needs to send to the device. If you only need one trigger marker you can put a 1 for ‘start data’ and a 0 for ‘stop data’. If you need more trigger markers you can add a column called ‘trigger_value’ in your Excel condition file. In that case, put $trigger_value in the ‘start data’ box and 0 in the ‘stop data’ box. Make sure the trigger markers are numbers starting from 1.
- Make sure the save onset and offset times, the sync timing with screen refresh, and the sync to screen boxes are checked.
- Check the port address. On your computer go to Device manager –> Ports –> Parallel Port –> Properties –> Resources –> The port address is under the settings header
- In Psychopy, go to File –> Preferences –> Hardware –> Parallel ports –> Click ‘…’ –> Click on the new item icon –> If the right address is already there you can go on to the next step, otherwise, add the address of your port by adding 0x in front of it (for example 0xEFF8). –> Click ‘OK and Apply’.
- Click on your parallel port component –> Go to Hardware –> Select the right port address
- For Windows users, a common error when trying to communicate via a Parallel Port component is that certain drivers are not found.
- Download the InpOutx64.dll and InpOutx32.dll files from https://www.highrez.co.uk/Downloads/InpOut32/. You need to use the “Binaries only - x86 & x64 DLLs and libs” option under the Download Links subheading near the bottom of the page.
- When downloaded, find and extract the .zip folder. This will be called something like “InpOutBinaries_1501.zip”.
- In the unzipped folder, find and copy the files “inpoutx64.dll” and “inpoutx64.lib” from the x64 folder, and then the file “inpout32.h” from the Win32 folder. Place a copy of all of these in the same folder as your PsychoPy experiment file (the one with the .psyexp filetype).
- In the InpOutBinaries_1501 folder there is also an installation
called “install drivers”, make sure you install these on your computer,
otherwise it won’t be able to read the files you added to your
experiment file.
- Restart PsychoPy (save your experiment first!)
- Set up the fNIRS and connect the trigger cable from the fNIRS device to the parallel port of the computer. If your PC or laptop does not have a parallel port, you can use the c-pod to send the triggers.
- If everything works correctly you can see the trigger lines in the recording in Aurora.
Example lab protocol (NIRx)
Basic rules
- No food and drink in the room.
- Do not pull on, twist, knot or kink the fNIRS fibers.
- Leave the room as you found it.
- Tidy up, return everything to its original place.
- Switch off the lights and close the room when leaving.
Preparation – Prior
- Decide on how recruitment is going to work and how are you going to manage attendance.
- Decide on the experimental room set up.
- TIP: For lab-based experiments it’s good to keep the NIRS behind the participant on a separate table or put it on the wall to minimize the pull in the cables.
- Send out reminders the day before to the participants. You can already attach the information letter and the consent form prior.
- Check if everything is installed on the lab computers, connected and running smoothly (e.g., Gorilla links loading in the browser, PsychoPy experiment file).
- Check if all the equipment is available and on the right location. Make sure you have access to the right rooms.
- Make sure that the correct configuration file (created in NIRSite) is available on the data acquisition laptop/computer.
- Charge all the devices (e.g., fNIRS, structure sensor).
- Prepare a lab log sheet to track participant IDs and any possible noise (e.g., interrupted data collection).
- Run a few pilots to see whether everything is working smoothly (e.g., triggers).
Preparation – Upon arrival
- Arrive at least 30 minutes earlier, to make sure everything is switched on well before the experiment (e.g., fNIRS needs 15 mins to heat up).
- Setting up the fNIRS device.
- Connect the trigger cable.
- Attach the optodes.
- Connect the fNIRS wirelessly or via USB cable to the data acquisition computer/laptop.
- Open the data acquisition software (Aurora – NIRx) and connect the device.
- Set up extra devices (e.g., voice and video recording).
- Switch on experiment lights or put an ‘ongoing experiment’ sign on the door.
During the experiment
- Pick up participant. Make sure that participant ID is stored correctly.
- Explanation of the study.
- TIP: Write a script beforehand on the main points that you have to explain, keep it short and don’t use scientific terminology.
- Make sure that participants can have questions after reading the information letter.
- Give a short explanation of fNIRS before starting the set up.
- TIP: Highlight advantages and that it’s used a lot with children – very much non-invasive.
- Measure head size, IN-NZ, LPA-RPA. When measured, Cz should be in the middle from both IN-NZ and LPA-RPA direction. Move around the cap if necessary to meet these criteria.
- 3D scan/co-registration (more information on the procedure can be found HERE).
- Optodes are attached (if the headsize is known, this can be done before participant arrives to save time).
- Signal optimization.
- TIP: First always try to change for stronger top holders, if that doesn’t help, remove the optode and push the hair away with a cotton bud. The signal might also be bad due to environmental noise, if you have bright light in the room try to put on the black shower cap on the NIRS set up. If the connection is still not great with the scalp use the gel from the grey suitcase. (More info on signal optimization)
- Explain the task briefly.
- After the experimental task finished, the cap is carefully removed.
- Make sure that the participant’s attendance is registered for course credits or compensation.
- Debriefing.
After the experiment
- Make sure that all data files are saved and copied to the correct folder.
- TIP: Create a folder structure and a coding system for the participant IDs that will help you later to identify the files.
- Fill in the participant log sheet, note everything that might be interesting later for data analysis (e.g., lot of movement, someone opened the door).
- Fill in the fNIRS log sheet (configuration, charge, etc. for other
lab users).
- If no next participant, then switch off all the devices in the room.
- Remove the optodes from the cap and put them away carefully.
- Make sure that everything that needs to be charged, is ready for the next measurement. Don’t leave the devices on charge overnight.
- Switch off the lights and close the door.
Learn more about practical tips when conducting fNIRS research:
Hair management tips for fNIRS by Cortivision
Xu Cui’s blog on fNIRS tips
How to set up your functional near-infrared spectroscopy Brite
NIRx - NIRScap Speed of Setup - fNIRS